Tampilkan postingan dengan label and. Tampilkan semua postingan

Selasa, 19 April 2016

Oars and ends


Today was a hodgepodge of activities. I began the morning lacing the leathers on the new oars I received recently. The lacing process was made more difficult by very confusing directions that came with the oar leather "kit". For instance, measuring distances from the "top" of the oar begs the question, "Which end is the top?" It is also unhelpful to say the seam should lie "parallel" to the blade, since a seam in any position around the 360 degrees of the loom (or shaft) of the oar could be said to be parallel. But finally, after cutting the leather to size, meticulously marking and punching holes, and laboriously stitching the leather around the oar, I was satisfied with the result. After about two hour work (which I wont count against the boat building total) I completed one oar.

I then went outside to enjoy another sunny warm midwinter day. Todays task was to trim the strakes at each transom. With careful use of a Japanese (flush cut) saw, and a belt sander with 80-grit paper, the strake overhangs were brought flush with the transoms. Further sanding with 120-grit paper in an orbital palm sander finished the ends nicely. There are a couple of small gaps between the strakes and the transoms that will need to be filled in with thickened epoxy. But all is ready for the next step; the glassing of the interior. Total hours 41.00.

Read More..

Sabtu, 16 April 2016

Risers knees and pads

Several little things got done today. The biggest job was to finish the rub rails: The ends were trimmed and shaped, and then the two layers of the rail were sanded down into one smooth rail. At that point, the edges on top and underneath were shaped with the router and 1/4" roundover bit. After that, the fitting of a few last items could be done. The oarlock risers, little tapered blocks of wood to which the bronze oarlock sockets will be mounted, were epoxied to the rubrails with cabo-sil thickened epoxy. There are two rowing stations on the Passagemaker dinghy, and so the two pairs of risers are mounted 14" aft of the midships bulkhead, and 12" aft of the forward bulkhead. The motor pads edges were rounded off with the router and it was then mounted on the stern transom. Finally, the bow and stern transom knees were "tack-welded" in place. The bow knee required some work, as the angle between the bow seat and transom was slightly smaller than what the knee was cut for. A little sanding and router edging prepared the knees for tack welding, which is to say, cabo-sil epoxy on the edge surface of the knees to hold them in place. They were made plumb and square, and taped to hold them in place while the epoxy cured. Once cured, a peanut-butter epoxy fillet will be applied around each one. Total hours 72.75.

Read More..

Jumat, 15 April 2016

Music Whenever St Paul and the Broken Bones The River Song

Nope! Not Otis Redding. Just some white dude and his white band and they just nail this blues song in a real bender of sterotypes.


Read More..

Kamis, 14 April 2016

Hot Free stitch and glue power boat plans

PDF Free stitch and glue power boat plans

We have experience useful for you yes this for Free stitch and glue power boat plans from another source Boatbuilding with stitch and glue plywood | glen-l boat plans, Fast-g stitch and glue plywood. this quick and easy boatbuilding method consists of plywood planking panels cut to shape from full-size patterns which are “stitched. Stitch and glue construction-boatdesign - boat designs for, This directory includes all of the plans that are specifically designed for stitch and glue construction. the rc model x-1 is an inexpensive way to try out this. Boat kit construction: stitch and glue boat building, These step by step videos show the stitch-and-glue kayak construction process. all of our boat kits are built using this "stitch-n-glue" construction.. Diy stitch and glue epoxy boat building marine epoxy tips, Stitch and glue boat building with marine epoxy, fiberglass cloth, and plywood getting started. Devlins boatbuilding: how to build any boat the stitch, Devlins boatbuilding: how to build any boat the stitch-and-glue way [samual devlin] on amazon.com. *free* shipping on qualifying offers. why is stitch-and-glue. Links to boat plans, some free boat plans and designs, Stitch and glue boat plans many designers offer plans for just about every kind of boat in stitch and glue form..

Free Plywood Boat Plans

Free Plywood Boat Plans

Trimaran Plans

Trimaran Plans

Small Wooden Boat Plans Free

Small Wooden Boat Plans Free

Plywood Kayak Plans Free

Plywood Kayak Plans Free

Wooden Canoe Plans Free

Wooden Canoe Plans Free

Now back to Free stitch and glue power boat plans

This unique put up is made for an individual if youd like hunting for Free stitch and glue power boat plans This info seriously popular a lot these people look for this. therefore I present content simply by matter Free stitch and glue power boat plans i really hope this particular can help you to locate the data you will need and much more but I cut here only

this issue you are looking for Free stitch and glue power boat plans

Read More..

Rabu, 13 April 2016

Down and back

Tonights tasks included the joining of the scarf joint for the bottom panel, and the bonding of the doubler to the stern transom. The bottom panel went well, after all the practice doing the same thing to the side strakes. It is just a little wider joint, and required care to get the two panels aligned and centered. With a string line, I measured the center down each panel to keep it straight.

Though I hadnt planned to do it, I had enough Cabo-sil thickened epoxy left over that I quickly did the reinforcing doubler on the stern transom. The parts are very accurately cut, and it was a quick deal to coat them, align, and clamp them together. I will later round the lower border of the doubler; it will give me a chance to try out my new router. Everything was then covered by a light sheet of plastic. With the heavy rain we had today, when the garage door is opened later tonight and tomorrow morning, water can drip on the bare wood and leave spots. Total hours 10.50.
Read More..

Senin, 11 April 2016

Zen of Daysailing A Dutch Valk and Jolle Segeln

Every once in a while I intersperse all my posts about planing boats, or racing, or boatbuilding with videos of people just enjoying a daysail and a day on the water. The wind is perfect, not too strong, not too light, the sun is out, the water temperatures are good for swimming. Sailing is best done with the feet up and a smile on the face.

The Dutch Valk klasse is similar size and original concept to the U.S.A.s Lightning class though with a squat traditional gunter rig. It appears the Dutch build them in fiberglass for recreational sailing - the PolyValken. (I think they reserve the wood ones for racing.) By the looks of this video, the Valk fits the recreational role superbly. (I like the cross thwart at the aft end of the cockpit allowing the skipper to recline and steer at the same time.)


Zeilen op de Kagerplassen from Muxio on Vimeo.

Jolle segeln is German for dinghy sailing. Here is a daysail in a true classic German dinghy, wood with traditional fittings. (Video settings doesnt allow me to embed.) Im not sure what the class is, maybe a reader can help out.

Read More..

Minggu, 10 April 2016

Sanding and second coat

The bulkheads and seat parts got a good sanding with 120-grit paper, and then a second coat of epoxy. The long list of tasks to complete before I can start assembling, or stitching, the hull is finally starting to dwindle down. Unusually cold temperatures have persisted in central Alabama, so I put a radiator style space heater in the garage in an effort to speed the epoxy curing. The epoxy itself isnt volatile, and the heater is away from any clutter, so I think it will be safe. Ill keep a close eye on it, just to be sure. The experiment here is to see if a 1500-watt heater has enough power to change the temperature in a fairly large two car garage. Total hours 14.75.


Read More..

Selasa, 29 Maret 2016

505 Dinghy and Annapolis 2017

I wandered over to my old sailing club, Severn Sailing Association, on Sunday and ran into Ali Meller, just in from Laser frostbiting. Ali is a long time 505 racer and I was interested in finding out how preparations are going for Annapolis to host the 505 Worlds in September, 2017. The 505 fleet at SSA is relatively small, ten boats or so, and to take on such a high-profile regatta as the 505 Worlds must be a daunting task for such a small group. To pull this one off, the 505 fleet has gone out to the Annapolis sailing community. Two yacht clubs are sharing the responsibility in running the event, SSA and Eastport Yacht Club and the RC is being recruited from the best of Annapolis. Given the strength of the dollar Ali expects the Worlds fleet to be around one-hundred, which, for North America, is huge numbers for a two man high performance dinghy.

Below is a great 505 promotional video shot by Chris Love, who does all of the Intercollegiate sailing reporting in the U.S. Although the 505 aficionados interviewed in this video downplay the intensity of the class, make no mistake; to race at the top level in the 505 is just below the commitment of an Olympic campaign. A true fanatics performance class.


International 505 Promotional Video from Chris Love on Vimeo.

Two photos of the 505 from the Earwigoagin archives; these taken at a SSAs Tuesday night series a couple of years ago.

Photo John Zseleczky

Photo John Zseleczky

For those who have dug back in Earwigoagin, you may have come across the fact that the blogmeister raced Internatonal 14s back in the 1970s and early 1980s. The International 14 of those years was very similar to the 505, single trapeze, big symmetrical kite. The modern International 14 has developed into a skiff but I occasionally wonder what the International 14 would look like today if it stuck with the rig of the 1980s - probably very similar to the current 505. A photo of the Canadian Harvey brothers ripping it, I think in 1980 (just had to sneak this in).

Photo Ellie Martin

Read More..

John Zs Mistral Bend em Up Stitch and Tape Boat Building Instructions

With the publication in Earwigoagin of the stitch and tape, Classic Moth, Mistral design offsets;
  • Mistral Hull Panel Offsets
  • and the Mistral Hull Section Offsets
I received an inquiry; "How do you actually assemble the hull? Again, I turned to master builder, John Z, and he supplied the following short PDF of photos and captions detailing at least the first assembly stages of a Mistral Classic Moth build project.


Read More..

Jumat, 25 Maret 2016

The i550 and the Chesapeake Challenge

Last May I ventured over the Bay Bridge to Kent Island to look at Chesapeake Light Crafts OcoumeFest and also to look at some of the competitors in the inaugural WaterTribes Chesapeake Challenge long-distance along-shore marathon (an offshoot of their Everglades Challenge). They were starting that Sunday morning of the OcoumeFest.

Of particular interest was the 17-foot i550 sport boat specifically built by the Gougeon brothers for these type of events. The race poses several challenges that a modern small sailboat is not normally designed for; low bridges, traversing very shallow water, human propulsion when the wind quits and for those endurance types, the ability to keep going on little-to-no-sleep. It is a race where it is tough for a sailboat to keep up with those machine-like kayakers who maintain a steady, grueling pace.

Bob Ames, John Z and I had an interesting conversation with the two sailors who were piloting the Gougeon i550 sport boat Hot Canary; Joe Frohock, the creator of the Mothmaran, being one of the team.

Click here for the Gougeon article on building the i550 Hot Canary.

Some photos:


The sleeping arrangements - just simple camp-mats laid on the floor under the cuddy cabin.


This is Joe Frohocks life-jacket. The following live on his life jacket during the race. A very sharp serrated knife, electrical tape, a whistle, a mirror, a high-pitched rescue whistle, a waterproof flashlight (and several other items Ive forgotten -I think he also had an EPIRB).


A mast tabernacle so the mast can be quickly pivoted down to get under bridges. It turns out this wasnt quite enough, the freeboard on Hot Canary too high for one of the bridges in the race. They were stuck in front of one low bridge for several hours until the tide went out.


A rudder cassette allows the rudder to be pulled up or "reefed" for shallow water steerage. The mulit-part shock cord assemblage allows the aft part of the cassette to bounce back in case of a hard grounding.


The sideview of the i550 sport boat. The i550 is specifically designed for home-building in plywood and has a flat bottom panel.


The rowing station was a simple carbon plank that sat on the side decks, just behind the lifting daggerboard trunk. Rowing the i550 was not one of the designs strong points. The flare to the i550 sides can be seen at the transom.


Joe Frohock, Bob Ames, John Zseleczky


Read More..

Senin, 21 Maret 2016

Looking for Small wooden boat plans and kits library

Hot Small wooden boat plans and kits library

meet here this time i Know useful for you main topic is Small wooden boat plans and kits library this is a little from other forum Chesapeake light craft | boat plans, boat kits, kayak kits, 1805 george avenue annapolis, maryland 21401 usa © 2008-2014 chesapeake light craft, llc all rights reserved. reproduction in whole or in part without written. Shell boats - sailboat kits sail boat kits wooden boat, Shell boats designs and produces economical sailboats kits for those who appreciate the beauty and practicality of modern wood construction.. Wooden boat builder: stitch and glue boat plans, For all degrees of boat building contractors, stitch and glue boat plans are the least difficult options. even so, if you are an novice boat contractor i. Bear mountain boats: wooden canoe, kayak and small boat, Canoe and kayak building plans use the wood strip building method. offers small model kits, books, videos, tech support forum, and building classes at various. Boat plans and boat kits for power and sail : the boat, 3] macnaughton associates yacht and commercial boat design, stock plans, and kits. (added: 26-oct-1999 hits: 20509) my links | rate | cached | visit macnaughton. Boat kits vs boat plans - pygmy boats: voted best wooden, Folks who want to save time and effort buy a stitch n glue boat kit, but others want to build from boat plans. for these people, pygmy boats offers full construction.

Celebs and Their Motorcycles

Celebs and Their Motorcycles

Red-Light Therapy Before and After

Red-Light Therapy Before and After

Celebs and Their Motorcycles

Celebs and Their Motorcycles

Small Wooden Boat Plans Free

Small Wooden Boat Plans Free

Free Model Boat Plans

Free Model Boat Plans

1st Small wooden boat plans and kits library

this posting may be for you actually in order for you interested in Small wooden boat plans and kits library This information extremely popular a lot these people look for this. consequently We existing blogposts by simply theme Small wooden boat plans and kits library related to it can assist you in finding the information you need is still a long I just took a little

individual thinking of Small wooden boat plans and kits library

Read More..

Sabtu, 19 Maret 2016

A Big Boy Up and Hammering

Every once in a while I get a hankering to pull out a video of one of those wide-body French offshore speed machines. This is the French PRB, one of those IMOCA 60s.


PRB Imoca 60 - Aerial footage from Valencia Sailing on Vimeo.


A video of the small tykes, the Mini-Transat 6.5s planing can be seen here.

Read More..

Minggu, 13 Maret 2016

Larry Huntington his 1895 scow Question and the first Seawanhaka Cup competition

Ive bracketed the 1890s in several posts tracing the history of the development of the racing scow. In 1890, at the beginning of the decade, Thomas Clapham introduced the first racing scow, Bouncer. At the end of the 1890s, Thomas Day and The Rudder magazine introduced the scow to the workingman sailor, with the publication of easy-build scow plans; first the 16 Lark cat-rigged scow designed by C.G. Davis in 1898 and, shortly after, the Swallow, a 24 main and jib scow designed by C.M. Mower and Larry Huntington. In 1895, in the middle of this decade, the first International Seawanhaka Cup commenced competition and over the next ten years, in this yearly pressure cooker of constant design development to win the cup, this odd-ball type, this "barn door" of a boat, dominated the racing and forever carved out a niche in the yachting scene that flourishes up to the present day.

In 1895, Larry Huntington, a twenty eight year old boatbuilder out of New Rochelle, New York, would enter his simple, crude-looking scow Question, in the trials for the U.S. contender to race Britain in the first competition for the Seawanhaka Cup . Although Huntington didnt win (W.P. Stephens in his conventional centerboard design Ethelwynn would win the trials and then successfully defeat Englishman William Brand racing another heavier, conventional centerboarder, Spruce IV to secure the first Cup win for the U.S.), Huntington demonstrated, during the 1895 season and during the Seawanhaka trials, that the scow was dominant in any breeze. Huntington re-emphasized what Thomas Clapham had proved five years earlier with his Bouncer, the scow was an ingenious rule-beater racing under a Seawanhaka Rule that penalized waterline length.

In a controversial move, Larry Huntington, with his brother Lev steering, shadow raced Question against Ethelwynn and Spruce IV in race four of the Seawanhaka Cup. There was a good breeze and Question handily out-distanced both of the actual competitors in the cup. W.P Stephens, with some justification, later complained about this stunt in Forest and Stream but the die had been cast. Observers at the Seawanhaka Cup, including the Royal St. Lawrence Y.C., took note and the next year all the top contenders had scow types including U.S designer Clinton Crane and the  Canadian design, engineering, and sailing genius, Herrick Duggan. Herrick Duggan, representing the Montreal club, Royal St. Lawrence Y.C., would come to dominate the cup competition in his scow designs over the next six years.

Larry Huntington would continue to design a series of well regarded scows for the Seawanahaka Cup competition both for him and his brother, and for other customers, though none of his designs were able to win the trials to represent the U.S. in the Cup competition.

Not surprisingly, in todays yachting history, Larry Huntington is best known, not for his scows, but for designing and building the offshore keelboat, Tamerlane, to win the first Bermuda race in 1906 (he designed and built two out of the three original competitors in 1906, the other Huntington design being Gauntlet).

A photo of Larry Huntington from Yachting magazine.


The half-rater Question as sketched by C.G. Davis. By 1905 Question had been converted to a motorboat with a boxy cabin-top (top right of sketch).

Larry Huntington estimated his cost for getting the simple chined Question built and in the water at $245 (he charged his labor at normal shipwright wages). The Rudder magazine figured this was 1/6 the cost of the other Cup racers.


Paprika was Larry Huntingtons refined scow design as a follow-on from Question. Built for the 1896 Seawanhaka Cup trials, the hull was round-bilged


Below are the lines to the mysterious American scow, Maika Maili, that was imported into New Zealand in the mid 1890s and formed the basis for the New Zealand famous Patiki class. There is a very strong resemblance to Huntingtons Paprika design but, at the present time, I can find no confirmation that Huntington exported one of his scows to New Zealand


Read More..

Sabtu, 12 Maret 2016

Zen and the art of sanding


Today it finally happened: I was able to achieve sort of a zen-like trance while I was sanding. While pressing on with the tedious job, I was able to zone out and think of more pleasant things to pass the time. As a result, work seemed to go a lot faster today. And most importantly, enough parts are now prepared that I am going to start drilling and stitching tomorrow. It will be interesting to see the hull take shape. All this prep work should have its benefits. The instruction book says after the final 220-grit sanding, the parts "should need little or no further finishing" after assembly. And that would be just fine with me! Total hours 19.50.
Read More..

Rabu, 09 Maret 2016

Boat Plans and Kits

Assembling your own aluminum may be a tremendous enterprise to undertake. Aluminum constructed boats offer a host of edges - these contain the repair-skill, a lightweight stuff, corrosion-resistant, can not be difficult to keep and offers a lasting and robust building. To start the job its critical to find a set of do it yourself aluminum boat plans.


Locating the perfect strategies for the aluminum constructed boats have reached the ends of your fingertips. Theres also a great collection of printed publications on this subject.


A simpler alternative to a list of hull materials and a set of plans would be to buy a metal boat kit that is complete. These kits come with all plate sections pre- identification sheets, cut and in-depth step-by-step directions to make the construction procedure run as smooth as possible. Additionally, it can help in the building process if the contractor having access to an under cover workshop and has a knowledge in welding abilities.


Taking on a self-build job of this magnitude is also an excellent achievement on end and offers lots of pleasure.


512 DIY Quality Boat Building Plans, Visit Link : http://tinyurl.com/mogcvts


Read More..

Senin, 07 Maret 2016

Know Now Stitch and glue power boat plans

Topic Stitch and glue power boat plans

We have experience and you can take a benefit from here this about Stitch and glue power boat plans taken from diferent source Boatbuilding with stitch and glue plywood | glen-l boat plans, Fast-g stitch and glue plywood. this quick and easy boatbuilding method consists of plywood planking panels cut to shape from full-size patterns which are “stitched. Stitch and glue - wikipedia, the free encyclopedia, Stitch and glue is a simple boat building method which uses plywood panels stitched together, usually with copper wire, and glued together with epoxy. this type of. Stitch and glue kits | glen-l boat plans - build your own boat, Stitch and glue kits are a must for building our stitch and glue boats. these kits include copper stitching wire, screws and boat nail fasteners (if required), silica. Stitch and glue construction | guillemot kayaks - small, Assembling the panels and stitching them together then gluing a stitch and glue night heron; free stitch and glue kayak plans; making the coaming on the stitch and. Diy stitch and glue epoxy boat building marine epoxy tips, Stitch and glue boat building with marine epoxy, fiberglass cloth, and plywood getting started. Eureka canoes - light simple wooden touring canoes stitch, Michael storer boat design eureka 155 - pretty, lightweight, plywood, touring canoe - simple to build. stitch and glue boat plan length - 156" (4.73m).

Stitch and Glue Boat Plans

Stitch and Glue Boat Plans

Free Pirogue Plans

Free Pirogue Plans

CNC Kits

CNC Kits

Wooden Flats Boat Plans

Wooden Flats Boat Plans

Stitch and Glue Boat Plans

Stitch and Glue Boat Plans

Now back to Stitch and glue power boat plans

This blo is certainly those who prefer searching for Stitch and glue power boat plans This review increasingly popular a whole lot many people search for thi. to do this point in time That i publish articles or blog posts by just niche Stitch and glue power boat plans with regards to the will allow you discovering the results you require is still a long because the only review I just picked it up a little

The topic youre looking for Stitch and glue power boat plans

Read More..

Sabtu, 05 Maret 2016

Header Photo Classic Moth Midwinters and Report from 2015


The previous header photo was of the 2011 Classic Moth Midwinters, held at Gulfport Y.C Florida, the last one I attended.

The 2015 Midwinters were held again at Gulfport Y.C, over the crossover February/March weekend. Ten Classics attended but unfortunately, this year, no-one from the Florida fleet raced. Saturdays racing was called off with the threat of thunderstorms but Sunday offered up warm temperatures and a pleasant racing breeze. Mark Saunders arrived with a makeover on his venerable Mistral; he added a "Linton rocking" rig and a new North sail to secure victory in Gen II class. The three Mistals finished at the top of the heap in Gen II with a Skol, a Duflos, and a modified, Lane Reeves Mistral following. In the Gen I class, long time class stalwart, George Albaugh in his Olympic Europe, finished comfortably ahead of three other Olympic Europe dinghies.

Much thanks to Amy Linton, who bore the brunt of the organizing this excellent regatta.

A mix of photos from Amy Linton and John Zseleczky.

One of the starts. #79 is Mike Parsons in his Mistral. #2721 is Frickie Martschink in his Skol, and #4067 is Lewis Hayes, hugging the RC boat.


Erik Albaugh in his Lane Reeves, mod-Mistral. Lane Reeves, when he bent up this Mistral, ended up with a finer bow and a flat transom.


Frickie Martschink - he of the post Lunch of Champions - had good speed in his Skol.


Winner of the Gen II class, Mark Saunders in his Mistral.


Famous designer, Charlie Morgan showed up to look at the fleet. It appears he cut his teeth on the Moth when he was a "youngin". Here is talking to Tom Price of the Chesapeake fleet. Charlies son is standing next to Charlie.


Two of the four Classic Moths from the Chesapeake fleet who attended. On the left is John Zs Mistral (he finished 2nd in Gen II) and on the right is Tom Prices Duflos.


Rod Koch, George Albaugh and Erik Albaugh debate one of the finer design points of the Lane Reeves mod-Mistral. George and Erik made up the other portion of the Chesapeake contingent.


Click here for other posts on the Classic Moth Midwinters.

Read More..

Kamis, 03 Maret 2016

Vintage Photo of a Sneakbox and Catboat

I pulled this vintage photo off the Internet.

The photo is obviously staged but does show a sailing day trip to the New Jersey bays. The growth of the railroads out to the New Jersey shore allowed the Philadelphia and New York crowd to enjoy day trips where local watermen would gladly take them out on "party" catboats, or if you were adventurous, you could rent out the smaller sneakbox for a sail. Date for the photo...my guess is the 1890s. No idea of the actual location.


Read More..

Jumat, 26 Februari 2016

Interior fillets and glass

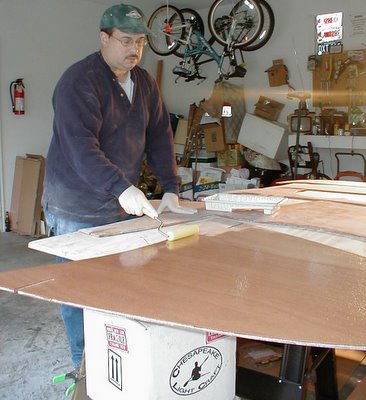
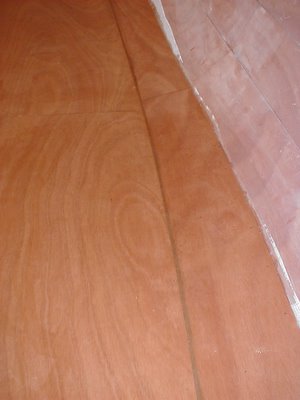
Just ahead of a possible rare snowfall in the Birmingham area, I finished the job of glassing the interior of the boat. The first step was to apply a fillet of wood flour-thickened epoxy to the joint between the bottom panel and the first strake. This filled the gap that existed in some spots, and also created a smooth radius to accommodate the glass cloth. This had to be done carefully and neatly, since it will be visible underneath the cloth and the bright (varnished) finish that will be used in the interior. With the fillet freshly applied, the cloth was laid over the bottom and first side panel and wrinkles were smoothed. At the beam, the cloth is just wide enough to cover. At this point, the unthickened epoxy was mixed, poured, and carefully spread and worked into the cloth. Wrinkles and bubbles were worked out, and the result was satisfactory. I found that I had to keep a watchful eye especially on the joints and stitch holes, as new air bubbles kept appearing underneath the cloth. These are easily removed, but more kept appearing for an hour or so before everything became saturated. In a couple of hours, the epoxy will reach gel stage, and the excess cloth can be trimmed off, as before on the exterior. The third photo below below shows a closer view of the fillet and glassed bottom. For a novice, a decent job. Total hours 46.25.
Read More..