Real Little chief sof canoe
Hi, now i have information useful for you this about Little chief sof canoe this is a little from other forum The scourge of navy seal imposters: part one | sofrep, The scourge of navy seal imposters. by special guest contributor and seal teammate don shipley of extreme seal experience.. Panorama - youth media - takingitglobal - welcome to, Culture humanicy: the human side of diplomacy by adobe youth voices @ takingitglobal december 18, 2014 ‘in the words of aristotle, ‘the aim of art is to represent. July 2011 | papercraft paradise | papercrafts | paper, The special operations forces (sof) combat assault rifle, or scar, is a modular rifle made by fn herstal (fnh) for the united states special operations command (socom. Maigret - s - trussel, Sa sc sd se sh si sk sl sm sn so sp sq st su sÛ su sw sy . sa. sab sac sad saf sag sah sai sal sam san sao sar sas sat sau sav. Top-brand outdoor gear and clothing at rei. satisfaction, Rei is the worlds premier outdoor gear store. find everything you need for outdoor adventures such as camping, hiking, biking, skiing, snowboarding and more. we. Bumpus biographies - wells family history, The bumpus biographies iii: the bompas family - medicine, the law and the church bw > b1/2: children of george bumpas, yeoman and baptist of bredon, d 1766.


Read More Little chief sof canoe
This url is without a doubt some people will require trying to find Little chief sof canoe This data highly sought after a lot these people look for this. due to this time period When i write about articles or blog posts by just niche Little chief sof canoe lets hope this unique will assist you find the internet you will want and much more but I cut here only


 With all the stitches removed from the hull (except those temporarily holding the bulkheads in place) it was time to return to the joints between the strakes. The LapStitch joints were fully filled with cabo-sil thickened epoxy, and areas where the stitches had been were filled in. Smoothing things off with a rubber spatula from an auto body shop was the method I used to make things as neat as possible. It was a humid 65 degrees in central Alabama today, and near 70 degrees in the shop, so the epoxy set up fairly fast. Near the end of an hour or so of smoothing, I found the epoxy getting hard to work with. But with the joints all reasonably well filled in and neat, I went over the hull with an alcohol soaked rag to wipe up drips and smears, as well as a couple of drips into the interior of the hull where epoxy had been forced through some of the stitch holes. Total hours 37.00.

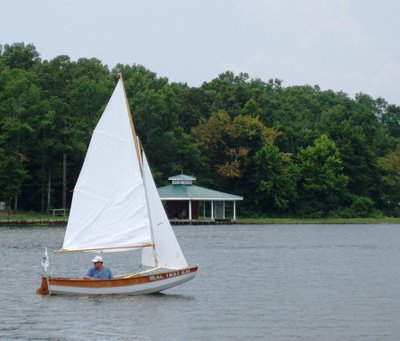 With the first official sail last weekend of Fuggles, the purpose of this blog officially comes to a close. About nine months ago, I stumbled on a web site for a small company called Chesapeake Light Craft and was instantly intrigued by the collection of small wooden boat kits they had to offer. It wasnt long before a collection of parts arrived in a shipment at my door. This blog has detailed the conversion of the oddly shaped pieces of plywood into a beautiful wooden sail boat. It has been a wonderful experience for me. Since I started out with virtually no woodworking skills, it is a pleasant surprise to end up with a product that I can be so proud of; a true testament to the Passagemakers designers and all the people at CLC. You can view a short slide show of the building and launch of my boat here.
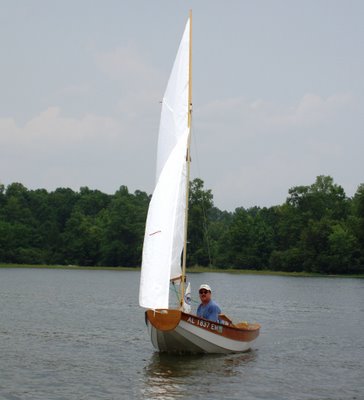


 Another batch of peanut butter epoxy, another seat. The bow seat presented its own obstacles during the installation. There was a sizable gap--about 3/4" -- between the #3 and #4 strakes and the edge of the front seat about 8" aft of the bow transom. Whether this is normal, or due to a flaw in my construction, I cant be sure. But it will require a process of building up some layers of epoxy to fill the gap. The space couldnt be spanned by one fillet of epoxy, but will instead require a second fillet be applied later over the one laid down tonight. Apart from the gap that ran for about 10" on either side of the bow seat, everything else went well. There was a very slight curve in the piece of plywood that makes the seat, so I added some weight in the form of my homebrewing propane tank to maintain a tight contact between the seat and the bow bulkhead. In all the rest of the edge, a standard fillet could be applied and smoothed. Total hours 69.75.


 After the assembly of the center seat unit, I turned to the other two bulkheads that will soon be installed in the hull. Reasoning that it would be easier to install the deck plates in a flat piece of plywood, I broke out my hand jig saw. A circle was marked on each bulkhead by tracing around the edge of the deck plate cover. According to the instructions, cutting 1/8" outside this circle would provide the proper sized hole. It was much easier that I anticipated to make an accurate cut. The inspection port in the stern bulkhead was located in the center, while the forward one was moved to the right side to avoid later interference with the mast step support. On the first bulkhead, I drilled little pilot holes for the six screws that hold the port flange in place. This turned out to be unnecessary, as I discovered with the second plate that they were indeed self-tapping, as advertised. Some silicon caulk was applied around the flange before it was screwed down. The result was a nice, clean, watertight yet removable opening in the two flotation air chambers that will allow ventilation.
 the Swedish eka working boat. There is a further bit of design heritage in the Passagemaker dinghy that should be mentioned. The famed small boat designer Sir Jack Holt also had his role influencing the design of the Passagemaker with his Mirror racing dinghy. This role is acknowledged by the Passagemaker designer himself, John C. Harris, who says, "Both the Mirror and the Passagemaker are prams with gunter-sloop rigs, which is sort of my wink-and-nod to Holt." Indeed, the economical
  gunter rig is found in both boats, combining a fast, weatherly Marconi-style rig with the convenient short and transportable spars of a gaff rig. But beyond that, the serious racing purpose of the Mirror is apparent: the design sports a finer bow, a planing hull, and the more complex and versatile running rigging of a class racer. Many mirrors are also equipped with hiking straps and trapeze wires for hard sailing, in contrast to the simpler, all-purpose configuration of the Passagemaker. Large numbers of Mirrors exist today, and Mirror clubs are active in England. There, the fine art of dinghy sailing is refined, and subtle points of rig tuning discussed. Passagemaker builders have Jack Holts Mirror dinghy to thank as another design influence.


 The positioning of the skeg and bottom skids was one of those tasks that require a second pair of hands. Fortunately, Kathy was off work tonight, and was available to help out. A centerline was marked from the stern transom to the daggerboard trunk slot, and four holes were drilled through the bottom panel along this line. The position of the two 41" long bottom skids were also marked, 41" from the stern transom and 7-1/2" from the centerline of the hull. Holes for four #8, 3/4" woodscrews were drilled from the interior and countersunk. Then, with Kathy holding the skids down, the pilot holes were drilled into them and the woodscrews screwed into place. After practice with the skids, the same process was followed with the skeg. The only difference with the skeg was that care was taken to hold it square to the hull as the holes were drilled. With all the parts test fitted and in place, they now are ready for epoxy and final installation tomorrow. Total hours 65.50.


