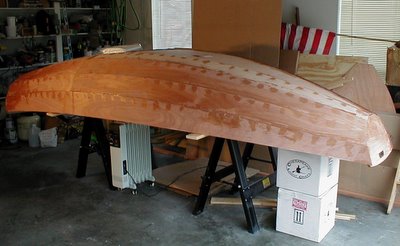
 With shop temps pegged at 70 degrees again today, I set about to plug the holes left from the removed stitches. For each of the nearly 300 stitches that had held the hull together, there were two holes, so that meant a lot of plugging. Fortunately, it was fairly quick work. With the Steelers game playing in the background, I mixed up a small amount of wood flour thickened epoxy and filled each hole with a metal putty knife. At this point, the boat is at a milestone of sorts. Except for a few remaining stitches temporarily holding in bulkheads, the hull for the first time is essentially watertight. It would actually float-- at least for a while. A pleasant thought... I guess that reflects progress. Total hours 38.25.
Tampilkan postingan dengan label holes. Tampilkan semua postingan
Tampilkan postingan dengan label holes. Tampilkan semua postingan
Sabtu, 16 April 2016
Plugged stitch holes
Rabu, 16 Maret 2016
Holes in my Maser
One difference as I have aged is I dont mind cutting holes in my boat. I wouldnt have even contemplated such an undertaking as a youngn.
Last fall I was trying to figure out why I had paint cracking on the aft deck of my Maser. The aft deck seemed very soft. Three mm. plywood is flexible but this seemed worse than usual. The only way I was going to find out was to cut two holes in the aft deck. It turned out that there was a mini-frame, about 50 mm. deep, of 3 mm. plywood, set aft about 300 mm. from the main aft bulkhead. It had cracked on both sides about 150 mm. in from gunwhales, probably when I had moved aft on that area on a heavy-air reach.
To make the frame whole again, I sistered the frame at both the cracks.
The following photos show the process of working backwards to get a watertight aft deck once the repairs had been made.
Backing pieces glued on. Plywood top piece cut to fit. I used a top piece of pine as a gluer for the plywood top piece on the aft side. This also gave some added I-beam strength above the mini-frame. (I cut the hole right next to the mini-frame repair and didnt have room for an aft backer strip.)

Close up of the open hole with backers in place.

Both plywood pieces in place, glued up. Top aft I-beam pine piece glued down.

Repairs glassed over with 9 oz biaxial cloth.

I was eventually able to get some primer down and that is how she looks at the present time. Good enough for a Tweezerman repair.
Click here for the original Maser post.
Read More..
Last fall I was trying to figure out why I had paint cracking on the aft deck of my Maser. The aft deck seemed very soft. Three mm. plywood is flexible but this seemed worse than usual. The only way I was going to find out was to cut two holes in the aft deck. It turned out that there was a mini-frame, about 50 mm. deep, of 3 mm. plywood, set aft about 300 mm. from the main aft bulkhead. It had cracked on both sides about 150 mm. in from gunwhales, probably when I had moved aft on that area on a heavy-air reach.
To make the frame whole again, I sistered the frame at both the cracks.
The following photos show the process of working backwards to get a watertight aft deck once the repairs had been made.
Backing pieces glued on. Plywood top piece cut to fit. I used a top piece of pine as a gluer for the plywood top piece on the aft side. This also gave some added I-beam strength above the mini-frame. (I cut the hole right next to the mini-frame repair and didnt have room for an aft backer strip.)
Close up of the open hole with backers in place.
Both plywood pieces in place, glued up. Top aft I-beam pine piece glued down.
Repairs glassed over with 9 oz biaxial cloth.
I was eventually able to get some primer down and that is how she looks at the present time. Good enough for a Tweezerman repair.
Click here for the original Maser post.
Langganan:
Postingan (Atom)